What to Expect From Permanent Outdoor Lighting Installation in Salt Lake City
The most common question we get before an install isn't about price or colors or the app. It's "what's actually going to happen to my house?" Which makes total sense. Someone's about to spend a few thousand dollars on something that gets permanently attached to their roof. They want to know the process. They want to know the timeline. And they want to know what their fascia is going to look like when it's done.
We've installed permanent lighting systems on hundreds of homes across the Salt Lake Valley, from single-story ranches in Eagle Mountain to big custom builds on the Draper benches. Here's what the process looks like from the first phone call to the moment you turn your lights on for the first time.
Step One: The On-Site Quote
Everything starts with a visit to your home. We don't do over-the-phone estimates or online guesswork. Every roofline is different, and the only way to give you an accurate quote is to measure it in person.
During the visit, we walk the perimeter of your home and measure every section of fascia that will receive track. We note peaks, valleys, corners, dormers, and any tricky transitions. We look at the fascia material and color so we can match the track precisely. And we talk about what you want the system to do: front only or full perimeter, specific zones, motion sensor locations, and where the controller box will go.
This visit usually takes 30 to 45 minutes. You'll get a detailed quote with exact linear footage and total cost. No hidden fees, no surprise add-ons on install day.
Step Two: Design and Material Prep
Once you approve the quote, we order your materials. The track is custom-cut and color-matched to your fascia. This isn't a one-size-fits-all product pulled off a shelf. If your home has cream-colored hardie board on the front and darker trim on the garage, we match each section individually.
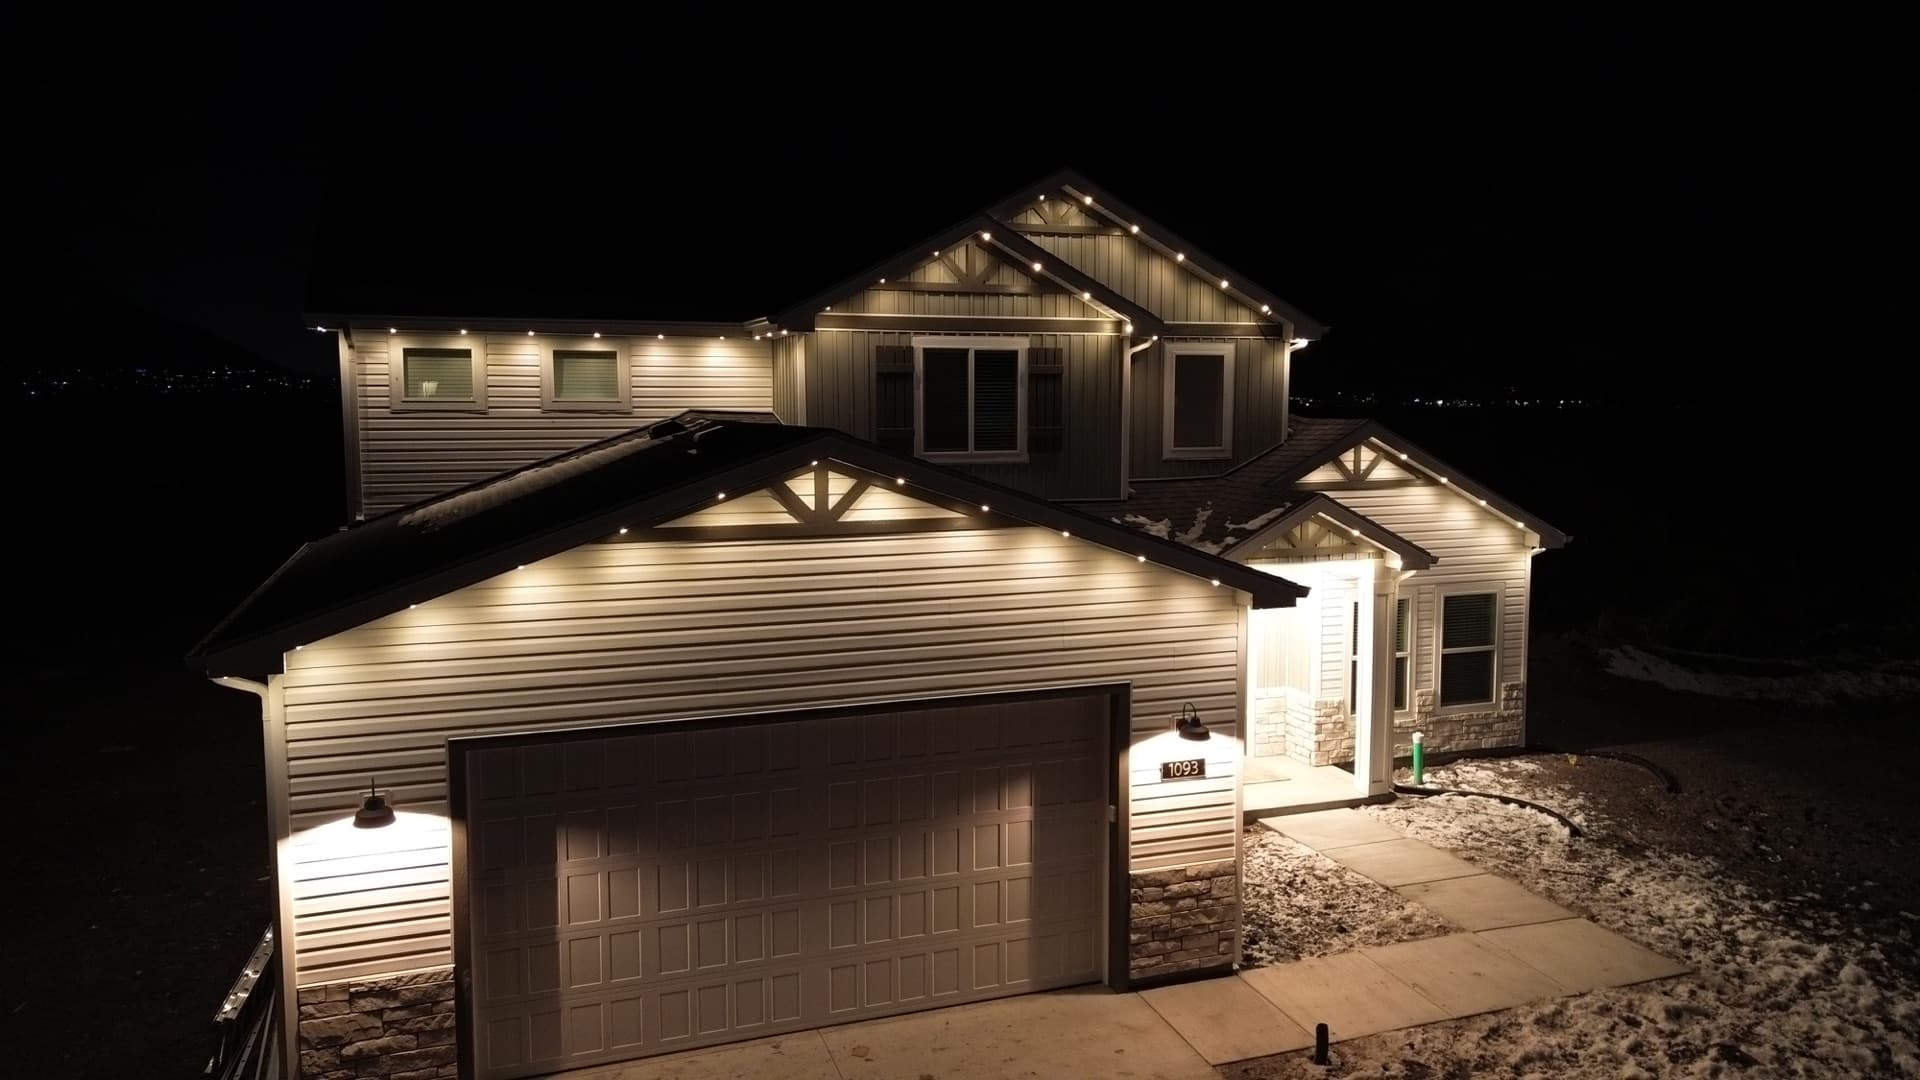
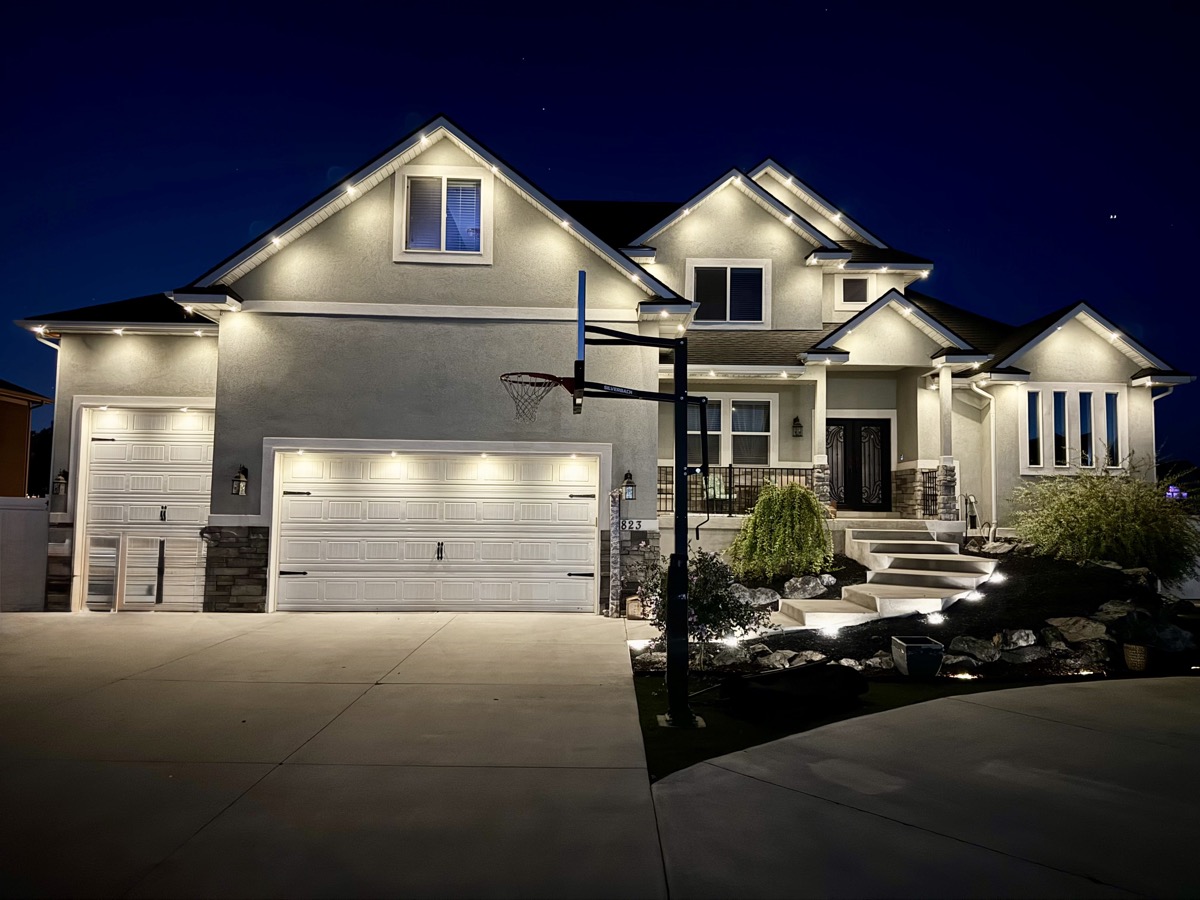
For Utah stone and stucco homes, which dominate neighborhoods like Cottonwood Heights, Holladay, and the newer builds in Herriman, the color match is especially important. The track needs to disappear during the day. If it's even slightly off from your fascia color, it shows. We take this part seriously because it's the difference between a system that looks custom and one that looks stuck on.
Material prep typically takes one to two weeks depending on the specifics of your order. We'll confirm your install date during this window.
Step Three: Installation Day
This is the main event, and it goes faster than most people expect. For a typical Wasatch Front home with 120 to 180 linear feet of roofline, the installation takes about one day. Larger or more complex homes might stretch into a second day.
Here's what happens:
Morning setup. The crew arrives with all materials pre-cut and pre-staged. Ladders, safety equipment, and tools are positioned around the home. We protect landscaping and walkways during setup.
Track installation. The aluminum track is mounted directly to the fascia board using hidden fasteners. Each section is aligned, leveled, and secured. On corners and transitions, the track is custom-bent to follow your roofline precisely. This is the most time-consuming part of the install because precision matters. A crooked track looks crooked forever.
LED insertion and wiring. Once the track is mounted, the RGBW LED nodes are inserted at consistent spacing. All wiring runs are connected back to the controller location. Wires are hidden behind fascia, along roof edges, or through existing penetration points. Nothing is visible from the street.
Controller and power. The controller box is typically mounted in the garage, a utility closet, or on an exterior wall out of sight. It connects to a standard electrical outlet. No new circuits or panel work needed for most installations.
Testing and walkthrough. Before the crew leaves, every zone is tested for function, color accuracy, and brightness consistency. We walk you through the app, set up your initial scenes, and make sure everything is working perfectly. You'll have a warm white roofline by the time the crew packs up.
What Makes a Good Installation (and What to Watch For)
Not every permanent lighting install is the same quality, regardless of brand. If you're comparing installers, here's what separates a professional job from a mediocre one:
- Track alignment: Should be perfectly straight and level across long runs. Any wavering is visible from the street and it never gets better over time.
- Color matching: The track should be nearly invisible against your fascia during daylight. If you can see the track from 30 feet away during the day, it wasn't color-matched correctly.
- Wire management: All wiring should be hidden. No cables running down the side of the house. No visible connections. No loose wire hanging below the eave line.
- Corner work: Corners, peaks, and transitions should be clean with no gaps or overlaps. This is where lower-quality installers cut corners, literally and figuratively.
- Cleanup: The crew should leave your property cleaner than they found it. No scraps, no packaging, no debris in your landscaping.
At TruLight SLC, every installation is done by our own crew. No subcontractors. We've done this enough to know that the fastest way to a callback is sloppy installation. We'd rather spend an extra hour on alignment than come back to fix something that should have been right the first time.
Wondering what it would cost for your home? Get an instant estimate using our satellite tool. No visit required.
Get Your Free QuoteWhat Happens to Your Roof and Fascia
This is the concern that holds some homeowners back, and it's a legitimate one. You're attaching hardware to your house. What does that do to the fascia?
The track mounts with small fasteners that penetrate the fascia board but don't go into the roof structure. The holes are comparable to what a gutter clip or downspout bracket would create. If the system were ever removed (which is very uncommon given the lifetime warranty), the holes would be no different than any other minor fascia repair.
For homes with hardie board, wood, or composite fascia, the mounting is straightforward and well-established. For stucco, we use fasteners designed for masonry applications. For aluminum or vinyl fascia wraps, we work with the existing material to ensure a clean mount without warping or distortion.
The track actually protects the area underneath it from UV exposure, which can slightly extend the life of the fascia behind the track. It's a minor benefit, but worth mentioning since UV degradation of fascia paint is a real issue along the Wasatch Front where the sun is intense at altitude.

Timeline and Best Time to Schedule
From initial quote to finished installation, the typical timeline is two to four weeks. That includes the on-site visit, material ordering, and the install itself.
Here's the seasonal reality of scheduling in the SLC market:
- September through November: Peak season. Everyone wants lights before the holidays. Wait times can stretch to four to six weeks. If you want a pre-Thanksgiving install, book by mid-September at the latest.
- December through February: Quieter, but weather can push install dates. Cold temperatures don't prevent installation, but heavy snow or ice may cause delays.
- March through August: Best availability. Shorter wait times. More flexibility on dates. And you get to enjoy the system through summer instead of waiting until winter to see it.
Our recommendation: schedule your install in spring or early summer. You'll get better availability, and you'll have the system for Fourth of July and Pioneer Day instead of waiting until November to see it in action.
Ready to get on the schedule? We offer free on-site quotes with no commitment. Give us a call and we'll come measure your home.
Frequently Asked Questions
Do I need to be home during the installation?
You don't need to be present for the entire install, but we recommend being available at the beginning (to confirm any final details) and at the end (for the walkthrough and app setup). Many homeowners leave during the middle hours and come back for the final walkthrough.
Will the installation damage my landscaping?
We take precautions to protect landscaping, walkways, and driveways. Ladder feet are padded, and drop cloths are used when working over gardens or mulch beds. Crews are trained to leave the property clean.
What if my fascia needs repair before installation?
We'll flag any fascia issues during the quote visit. Rotted wood, peeling paint, or damaged sections should be repaired before the track goes on. We can recommend contractors for fascia repair if needed, but we don't do that work ourselves to keep our focus on the lighting.
Can the system be expanded later?
Yes. If you start with the front roofline and later decide to add the sides or back, the system can be expanded. Additional track, LEDs, and wiring are added to the existing controller. We design the initial installation with expansion in mind so adding on later is straightforward.
Related Articles
The install process is simpler and faster than most people expect. One day, one crew, and by the evening you're controlling your roofline from your phone. If you've been curious about what the process looks like for your specific home, the easiest next step is a free on-site quote. We'll measure everything, answer every question, and give you a number you can sit with. No rush, no pressure.